
| index | introduction | document properties | positioned elements | previewing | element properties | page backgrounds | images | grouping | alignment |
Although in theory any element, such as a paragraph, a table or an image can be positioned using CSS, in practice, you can only guarantee that browsers will position <div> elements correctly, so that's why every element in Layout Master is really a <div> element in HTML. If we want to add other elements, such as images, paragraphs and so on, we have to place them inside a positioned element or <div>.
We can simply type or paste a paragraph and its content in, as we did a little earlier. The same goes for an image. We could just type in the image element, with its src attribute. But that would be a bit tricky. We'd have to get the relative URL correct, which can just be a pain. Layout Master makes it much easier to add images (and, as we will see a little later, other kinds of HTML).
We'll start by adding an image.
To insert an image in a layout
1. choose from the menu
2. the open dialog box opens. From this, choose the image file you want to insert
Layout Master creates a new positioned element or <div>. The content of the <div> is an <img> element, whose src is the url for the image, relative to the HTML document for this Layout.
Exercise
The first image we want to add as a positioned element is called style_master.gif, inside the images folder inside the tutorial_exercise folder. Let's add this to the layout.
How did we get on? Can we guess where this piece goes? Clearly it goes at the top of the circle.
You'll even note that Layout Master has given both the positioned element, and the image element itself the correct width and height based on the width and height of the image. This works for gif images, but not currently for JPEG of PNG images.
Exercise
Our next task is to make this element sit on the circle in such a way that it looks like part of the circle. One thing that you might have noticed is that there is a rather ugly white square around the new element. That's because Layout Master doesn't support gif transparency. This image is in fact transparent, and so in a browser will appear as blended with the element behind it.
Let's now go and place this positioned element so that it blends with and appears part of the circle. One thing that might help us when it comes to fine-tuning your placement is that Layout Master supports nudging of elements. Simply use the arrow keys to move a selected element 1 pixel in the direction of that arrow.
How did we get on? It can be a little tricky at first. Here is a hint for using browser previewing to help.
There is a previewing option called Live Preview. This constantly updates any open preview browsers when a change is made to the layout.
To enter Live Preview mode
1. choose from the menu
There is one other thing we need to setup to use live preview properly. One of the options in the preferences window lets you specify whether you want to bring the browser window to the front when you preview. When live previewing, you probably won't want to do that, so go to the Preferences and uncheck "Switch to preview browser?".
Now, whenever you make a change to your layout this change will be immediately previewed in the background in any browsers you have running.
We have several other elements to add to the window. Rather than inserting each individually, wouldn't it be nice to add them by dropping them from the finder? Well, we can do just that.
To add one or more elements, for example images, to a page
1. drag and drop the file for the element from the Finder into the layout window
Exercise
In the images folder of our tutorial_exercise folder, you'll find the following gif files which we want to add to our layout.
Add each to the layout, and position it where it should go. As you add each new element, give it a sensible name, so that editing them later will be easier.
That might take a little bit of fiddling but here is what your page should look a lot like when you're finished.
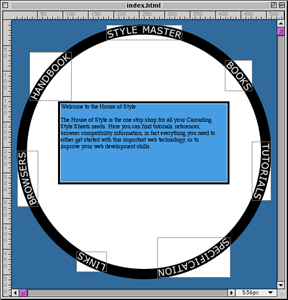
figure 19: completed circle
A pretty sophisticated layout, all with standards based HTML and CSS, in a pretty short period of time.
| index | introduction | document properties | positioned elements | previewing | element properties | page backgrounds | images | grouping | alignment |